


Method for Installation of HVAC System (Part-4)
METHOD FOR INSTALLATION OF HVAC SYSTEM (PART-4)
March 1, 2021 1 Comment
HVAC REFRIGERANT PIPE TESTING:
(A) REFRIGERANT PIPING (LEAK CHECK) BY PRESSURE TESTING:
- Pressure testing helps ensure a leak free system, a critical component to a successful installation. * Max PSI and duration of pressure tests can vary between manufacturers and should be reviewed in the installation manual. * All VRV systems should be pressure tested to 550 PSIG and held for 24 hours. * Pressure testing process: Tighten down stop valves before any pressure testing to prevent nitrogen * From leaking back through condenser and contaminating refrigerant. * Pressure testing shall be done in three (3) steps. * Step 1 – Leak check 3 minutes at 150 PSI * Step 2 – Leak check after 5 minutes at 325 PSI * Step 3 – Leak check after 24 hours at 550 PSI (450 psi for systems with vertical Air Handlers) * After the gauge reading reaches 550 psig, isolate the system by first closing the gauge manifold, then close the nitrogen cylinder valve. * Check the flared and brazed connections for leaks by applying a bubble solution to all joints. * The bubble solution must be a solution designed for refrigerant leak testing. Common soap solution must never be used on refrigerant piping as those contain chemicals that could corrode copper and brass, and cause product malfunction. * If the pressure does NOT drop for 24 hours, the system passes the test. * In this case, the pressure drop of 9.5 psig was due to temperature differences, therefore, there is no leak in the refrigerant piping system. * If the pressure drops and it is not due to ambient conditions, there is a leak and it must be found. Remove the bubble solution with a clean cloth, repair the leak(s), and perform the leak / pressure check again. * After the system has been thoroughly tested and no leaks are found, depressurize by loosening the charging hose connector at the nitrogen cylinder regulator. When system pressure returns to normal, completely disconnect the charging hose from the cylinder, and release the nitrogen charge from all refrigerant piping. Wipe off any remaining bubble solution with a clean cloth. * Ambient Conditions and the Leak / Pressure Check * If the ambient temperature changed between the times when pressure was applied and when the pressure drop was checked, adjust results by factoring in approximately 0.79 psi for each 1°F / 1°C of temperature difference. * Correction formula: (°F / °C Temperature when pressure was applied – °F / °C Temperature when pressure drop was checked) x 0.79. * Example: When pressure (550 psig) was applied, temperature was 80°F / °C; 24 hours later when pressure drop (540 psig) was checked, temperature was 68°F / °C. * Thus, (80°F / °C – 68°F / °C) x 0.79 = 9.5 psig.
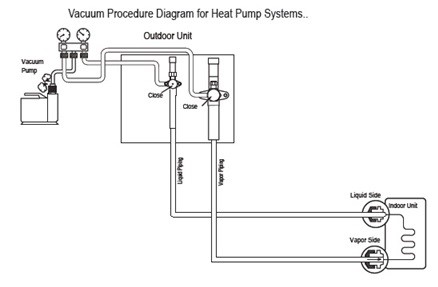
(B) TRIPLE EVACUATION (VACUUM)
- Why is a triple evacuation so important instead of a deep vacuum? Because the relationship between pressure and temperature with water. * When the first vacuum is pulled, some of the moisture in the lines boils and evaporates. * However, once it reaches a certain pressure the water will actually freeze and leave small ice crystals in the system. This is why a single deep vacuum is insufficient. * A triple evacuation of all piping should be performed to eliminate moisture in the system: * Do NOT open service valves until the deep vacuum of 500 microns or below has been achieved and the additional charge has been added * If Heat Recovery System connect to all three main refrigeration stop valves at outdoor unit. * Verify that the micron gauge is connected at a point where it can read the system’s pressure at all times during this process, even when the vacuum pump is not running during the hold test. * Evacuation procedures: Evacuation procedures shall be performed as follows: * Step 1- Operate the vacuum pump and evacuate the system to the 2,000 micron level. * Isolate the pump by closing the manifold gauges and the vacuum pump valve, and then watch the micron level. Micron level may rise a bit, but MUST eventually stop rising for fifteen (15) minutes. * If the micron level DOES NOT stop rising, there is a leak, and the leak test must be performed again. If the micron level DOES rise above 2,000 micron, re-open the manifold gauges and the vacuum pump valve and continue evacuation back down to 2,000 micron level. * If the micron level holds at 2,000 micron, Break the vacuum with dry nitrogen to a pressure of 2-3 PSI and hold for 15 minutes (this is to “sweep” moisture from piping). * Step 2- Evacuate to 1,000 micron level. * Isolate the pump by closing the manifold gauges and the vacuum pump valve, and then watch the micron level. Micron level may rise a bit, but MUST eventually stop rising for fifteen (15) minutes. * If the micron level DOES NOT stop rising, there is a leak, and the le…